
 This last couple of months I’ve been experimenting with home made smudge sticks. I love white sage smudge sticks, but unfortunately I can’t grow white sage here and so I have to buy the smudge sticks. I use smudge sticks a lot, I use them before I do any meditation or energy work, any therapy work, I use them to clean the house, clean my car, clean my space. I use them for any situation where I feel that negative energies may be present or have built up over time. So it made sense considering how much I use them to have a go at making my own!
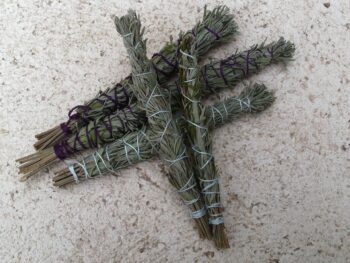
It’s possible to use a variety of plants for home made smudge sticks, you can use lavender, rosemary, cedar, thyme and of course white sage. You can also mix the plants together in one stick.
For my own experiments I used rosemary and Lavender since I have an abundant supply of both. I found Lavandula Dentata and French Lavender the best lavender to use as they have more leaves on it than some other species of Lavender like English Lavender.
So, it’s really simple to make home made smudge sticks;
- Cut off each stem to the same same, I did mine about 8 inches (20 cm)
- Trim any leaves from the base so that you have about an inch of stem showing at the bottom, this will make it easier to hold and bind.
- Take at least 12 stems, it really depends on what plant you have used and how bushy they are, but aim for a fat bundle!
- Choose a natural thread/twine to bind them, this will burn so natural is best.
- Cut the twine at about four times the length of your stems.
- Wrap and then tie the twine tightly around the base of the stems to secure them together.
- Start wrapping the twine diagonally around the bundle, pull the twine tightly as the leaves will shrink a bit when they are dry.
- When you reach close to the top wrap the twine around a couple of times and then start wrapping back down, forming a criss-cross pattern.
- When you reach the bottom tie the twine tightly and cut off any excess.
- Snip off any leaves that are standing out from the stick to keep it all tight, this will prevent any stray leaves catching fire!
- Snip off the top so that all the stems are even.
- Hang your smudge sticks to dry in a dark, cool place for 3-4 weeks….and that’s it! After drying completely they are ready to use.
I had a lot of fun making and using mine and I hope you do too, but always remember to be careful with fire and matches. Never leave anything burning unattended and always extinguish your smudge stick after use!
For more information on using smudge sticks and their properties check out my previous article on Smudging.